4.09 - Install and Deploy Security Onion
Task Install and Deploy Security Onion
Conditions
Given a Linux Security Onion machine.
Standards
- Configuring Security Onion (SO) from an instantiated virtual machine.
- Setup Security Onion firewall rules.
- Connecting to security onion from another box
End State
Fully functioning Security Onion NIDS recieving and parsing logs from target network segments.
Manual Steps
- Configuring Security Onion (SO) from an instantiated virtual machine.
-
Login to SO
Note: for range use creds from SharePoint- Open Terminal – click on
Applicationsin the top left corner, scroll down to "Utilities" then scroll and click onTerminal, leave this off to the side (id=TERM) - Launch setup – Double click setup icon on desktop Note: use password from step 1.1 in setup
- Select
Yes, Continue!– - Select
Yes, configure /etc/….– - Select the management interface – in TERM type ip address and verify that the interface has an ipv4 configured on it and is the same as the one selected
- Set a static ip – make sure static is selected and select
ok - Input the ipv4 address for the interface selected in step 1.6 then select
ok– refer to TERM - Input your network subnet – refer to TERM for subnet CIDR notation of interface selected in step 1.6
- Input your gateway IP Address – in TERM type ip route use ip after
default route ..<gateway> - Input your DNS – in TERM type nslookup then input any character and select
enter, add both DNS servers - Input your Domain Name - in TERM press
ctrl cthen type hostname -f input everything after the first period, select ok - Select
Yes, configure…to – configure sniffing interfaces - Verify that the interface selected in step 1.6 is not selected and select
ok - Select
Yes, make changes!– to confirm changes - Select
Yes, Reboot! - Log into Security Onion - Re-enter login credentials (step 1.1)
- Re-launch setup – double click setup icon on desktop
- Open Terminal – click on
-
input system logon password
- Select
Yes, Continueto configure services - Select
Yes, skip…to skip previously setup options - Select
Production mode - Select
New - Input first user account – don’t use default & remember for troubleshooting
Note: input the password twice - Select
Best Practices - Select
Emerging Threats Open - Select
Snort - Select
Enable our sensors - Select
Ok– accept default port configurations - Review monitoring interfaces – Select
Okonce you have reviewed to make sure the management interface isn’t selected - For HOME_net input each subnet that is considered to be on the local subnet
- Enter subnet scope – for each subnet found in network use CIDR notation separated by comma to list out subnets, click
Ok - Select
Yes, store..to store logs locally - Select
Okto accept default log size - Select
Yes, proceed..to finish configuration - Once complete, select
oksix times
- Select
- Setup Security Onion firewall rules.
- Once previous task is completed, reopen TERM, refer to step 1.2
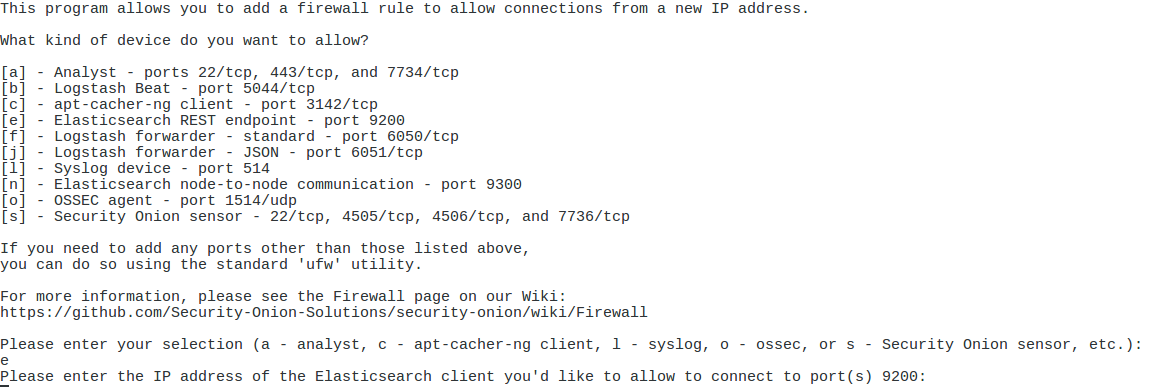
- Allow analyst system/range to access SO – for each device/range
Note: so-allow is the utility that will allow connections in the local firewall. This is used to allow analysts to connect, Wazzuh/Ossec agents to check in and forward logs, down-stream SO sensors to communicate, and more. Be mindful of your scope as this is creating holes in the firewall and remember DAPE (Deny All Permit by Exception)

- Enter ip address or subnet range in CIDR notation
- Allow communication with Elastic Search – for each device/range
- Enter Subnet range in CIDR notation
- limit this to the subnets that the business workstations are on & also the subnets with the analyst devices
- Add the syslog device for PAN logs
- Add Wazzuh/Ossec agents – typically workstation devices for each subnet
- Enter the subnet where workstations are located
- Register Wazzuh/Ossec agents – do this for each subnet inputted in previous step
- Connecting to security onion from another box
- On cyber laptop – open web browser
- Go to the ip of the security onion management interface step 1.6
- If you cannot get to the website make sure laptop is in the subnet from step 2.5
- From webpage click on Kibana
- Use credentials created in step 1.15
Dependencies
Security Onion
References
Security Onion Docs
Security Onion Docs - Local
Security Onion Walkthrough